Bowling Ball
Drilling Layouts
The complete reference for how pin position, VAL angle, and Pin-to-PAP distance shape ball motion. Learn the Dual Angle system, compare common layouts, and find why we dial every drilling to your hand.
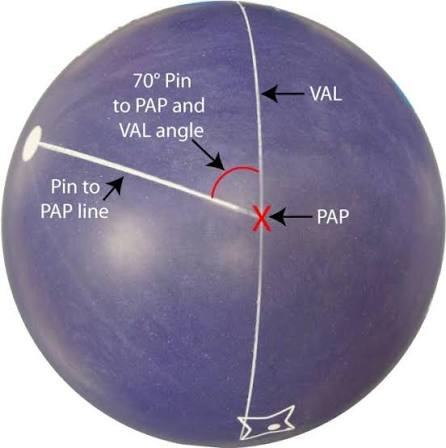
Pin-to-PAP Distance & VAL Angle
The Drilling Guide
Every layout is a relationship between four reference points and three numbers. Learn how pin position, VAL angle, and Pin-to-PAP distance shape ball motion — and why we dial every drilling to your hand, not a chart.
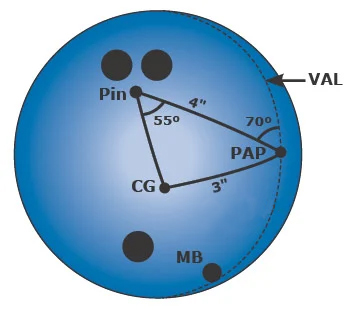
Every layout is a relationship between four reference points: the Pin, the CG, the Mass Bias marker (on asymmetric balls), and your Positive Axis Point. Get these four straight and the rest of layout theory makes sense.
Anatomy of a Layout
Pin
A small dot on the ball's surface marking the top of the weight block. Where the pin sits relative to your PAP defines the layout.
CG
Center of Gravity — the ball's static balance point, marked from the factory. Matters more on older symmetric drills.
Mass Bias
An additional marker found only on asymmetric balls. Its position relative to your PAP controls how strongly the ball flips on the backend.
PAP
Positive Axis Point — the single most important number in layout. The point where your axis of rotation exits the ball. Measured from a tracked ball.
The 3 Numbers That Define Every Layout
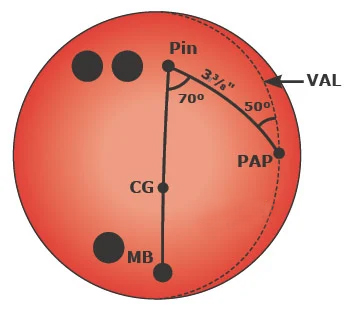
A modern Dual Angle layout is written as three numbers — e.g. 60° x 4.5″ x 35°. Each controls a different aspect of motion.
Drilling Angle
30° – 90°
Lower = earlier read · Higher = more length
The angle between your PAP and the line from your PAP to the pin. Controls how long the ball stays in the skid phase.
Pin-to-PAP
2.5″ – 6.75″
Short = strong rev · Long = length + flip
The arc distance between the pin and your PAP. Controls how the core revs up on the lane.
VAL Angle
20° – 80°
Lower = smooth arc · Higher = angular backend
Vertical Axis Line angle. Controls the strength and shape of the backend reaction.
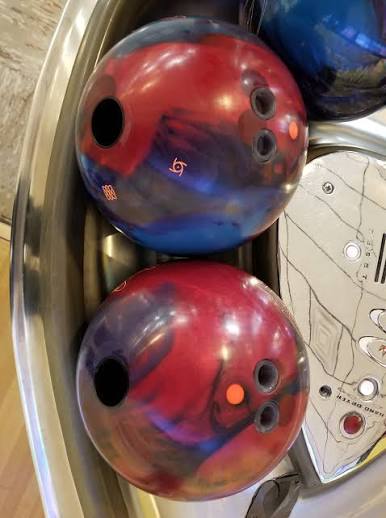
Pin Up vs Pin Down
Pin Up
Pin sits above the ring finger. The core has more flare potential, the ball revs later, and the backend motion is sharper and more angular.
- Ball Motion
- Length with strong backend
- Best For
- Medium to medium-dry oil
- Bowler Type
- Higher rev rate, faster speed
- Typical Pin Distance
- 4.5″ – 6.0″
Pin Down
Pin sits below the fingers. The core revs earlier, the ball reads the lane sooner, and the motion is smoother and more arcing.
- Ball Motion
- Early read, smooth arc
- Best For
- Heavy to medium-heavy oil
- Bowler Type
- Lower rev rate or stroker style
- Typical Pin Distance
- 3.5″ – 4.5″
Starting points used across pro shops. Final layout numbers should always be customized to your PAP, rev rate, and intended lane condition. These reference drills map directly to the ball motion you'll see on the lane.
8 Common Layouts Compared
Starting points used across pro shops. Final numbers should always be customized to your PAP, rev rate, and intended lane condition.
Strong Arc
45° x 4″ x 30°
Smooth, controllable, continuous
Heavy oil, fresh patterns
Balanced Benchmark
60° x 4.5″ x 35°
Medium arc, predictable
House shots, all-purpose
Length and Flip
70° x 5″ x 45°
Skid then sharp backend
Medium oil, fresh to transition
Dry Lane Control
75° x 5.5″ x 50°
Long, then defined break
Burnt patterns, dry conditions
Two-Handed Strong
50° x 5″ x 40°
High rev continuation
High rev two-handers, sport patterns
Stroker Friendly
40° x 3.5″ x 30°
Early read, smooth motion
Lower rev rates, classic strokers
Sport Pattern
55° x 4.25″ x 35°
Even motion, low recovery
PBA and challenge patterns
Spare Ball
90° x 6.75″ x 90°
Maximum length, no hook
Spare conversions
Don't guess your layout.
We measure your span, pitch, and PAP, then dial the drilling to your release. Book a fitting at The Wright Fit Pro Shop.